What Hi-Fi? Verdict
Magico's precise and powerful ASub is a masterpiece. With stunning audio reproduction in the low end and perfect tuning circuitry, this is a truly exceptional subwoofer... as long as you don't mind a lack of physical controls.
Pros
- +
Outstanding sound quality
- +
Best crossover circuitry ever
- +
Fantastic parametric EQ
Cons
- -
Cost of speaker grille
- -
Control only by computer
- -
Some user skill required
Why you can trust What Hi-Fi?
This review and test originally appeared in Australian Hi-Fi magazine, one of What Hi-Fi?’s sister titles from Down Under. Click here for more information about Australian Hi-Fi, including links to buy individual digital editions and details on how to subscribe.
I don’t think Magico’s latest top-of-the-range M9 speaker is going to sell very well here in Australia, for the very simple reason that a pair of M9s will cost you around one and a quarter million dollars, depending on the prevailing exchange rate with the US, where Magico loudspeakers are made.
That’s the bad news.
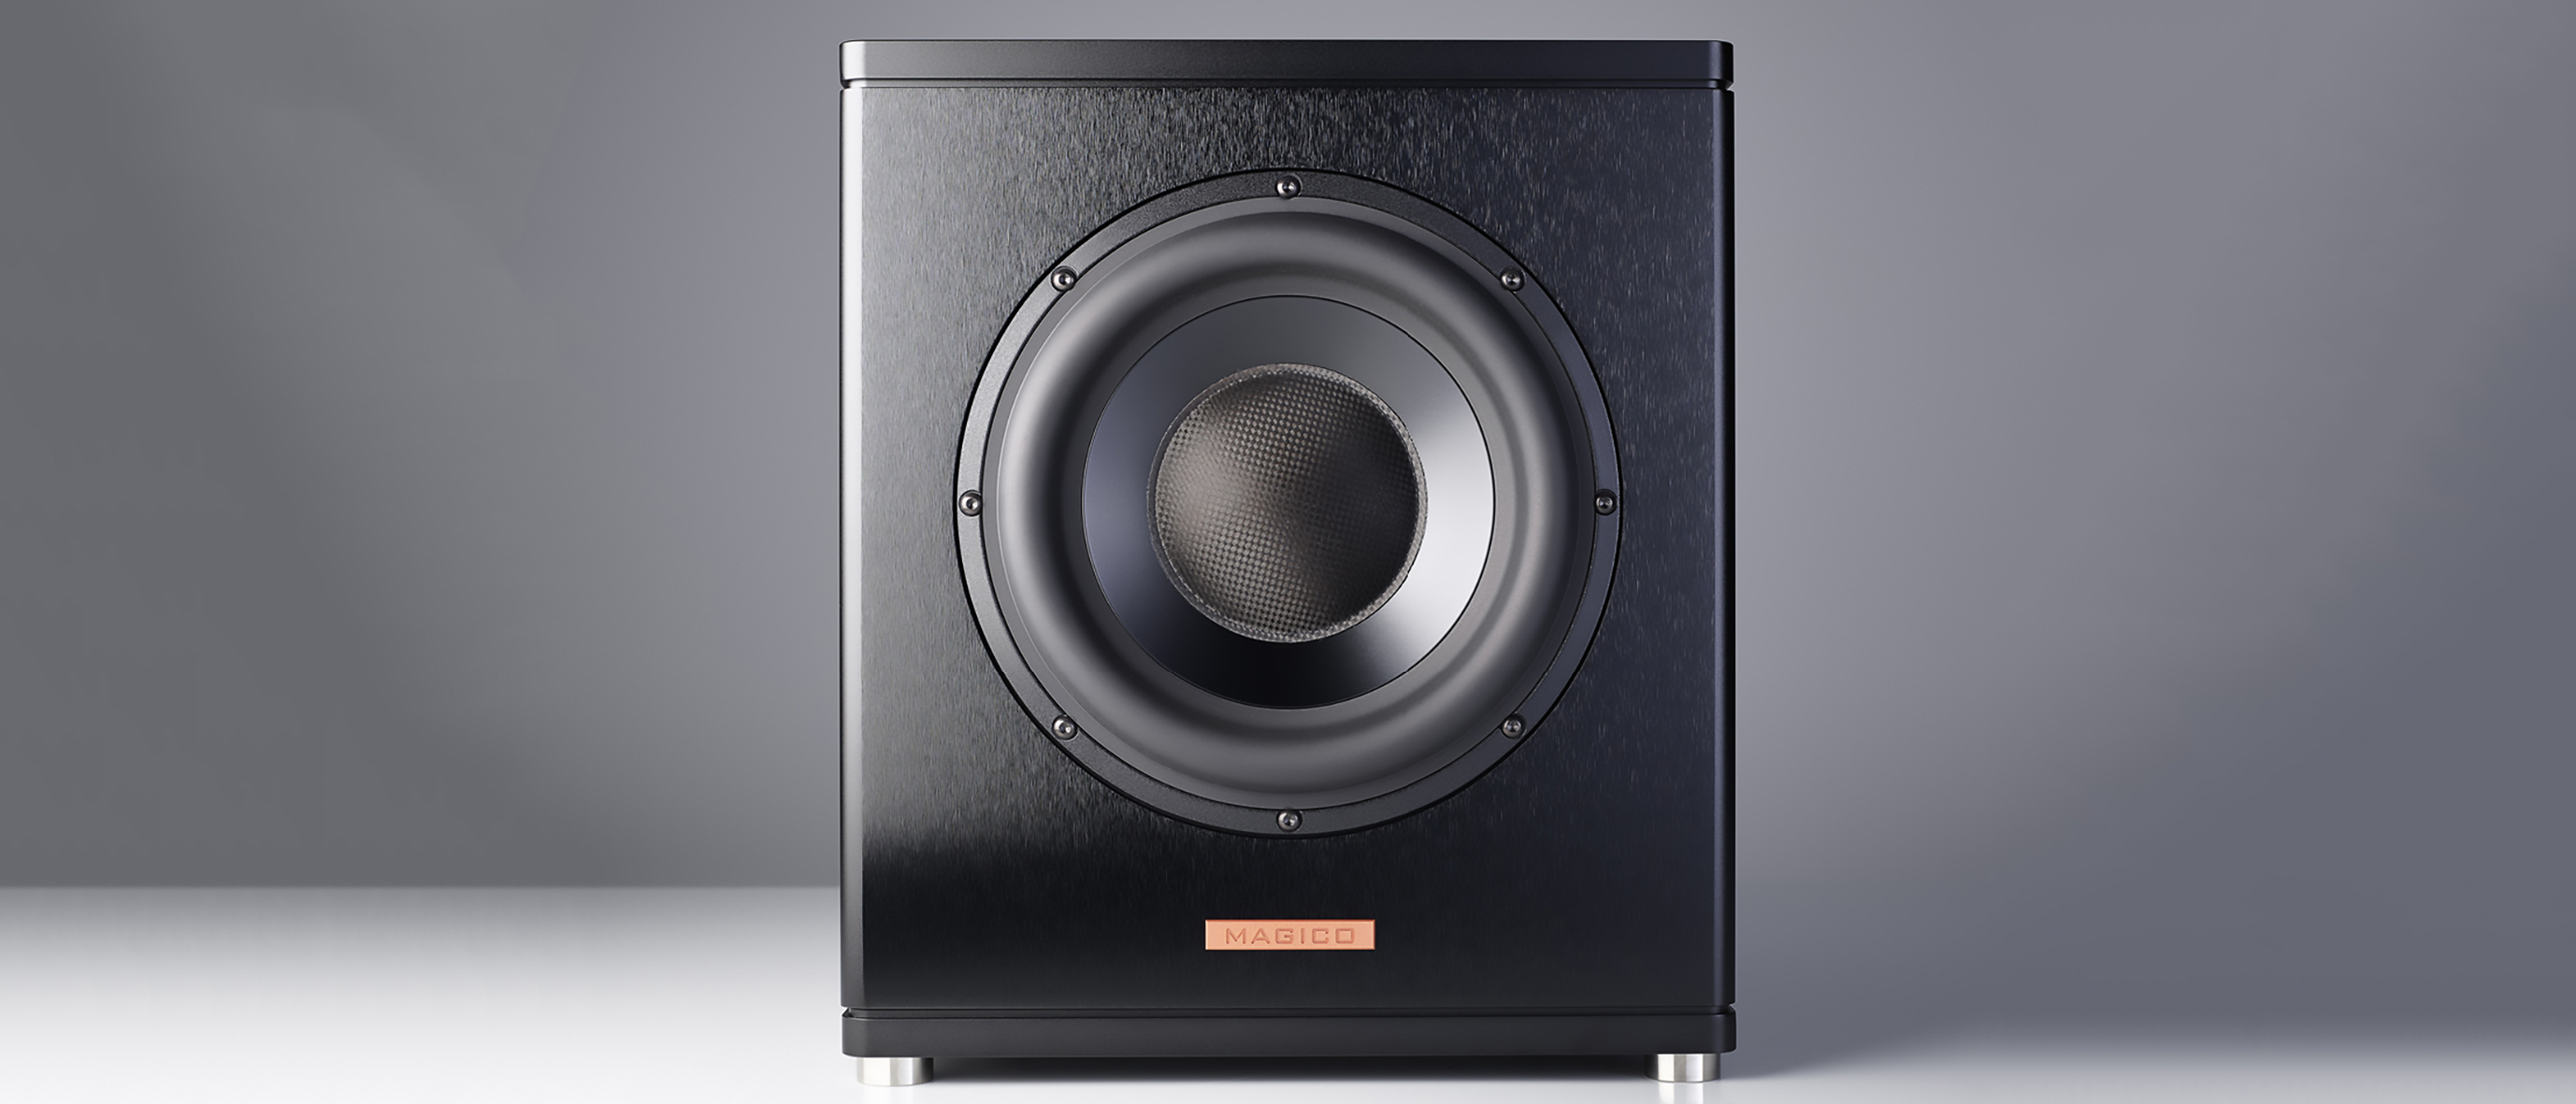
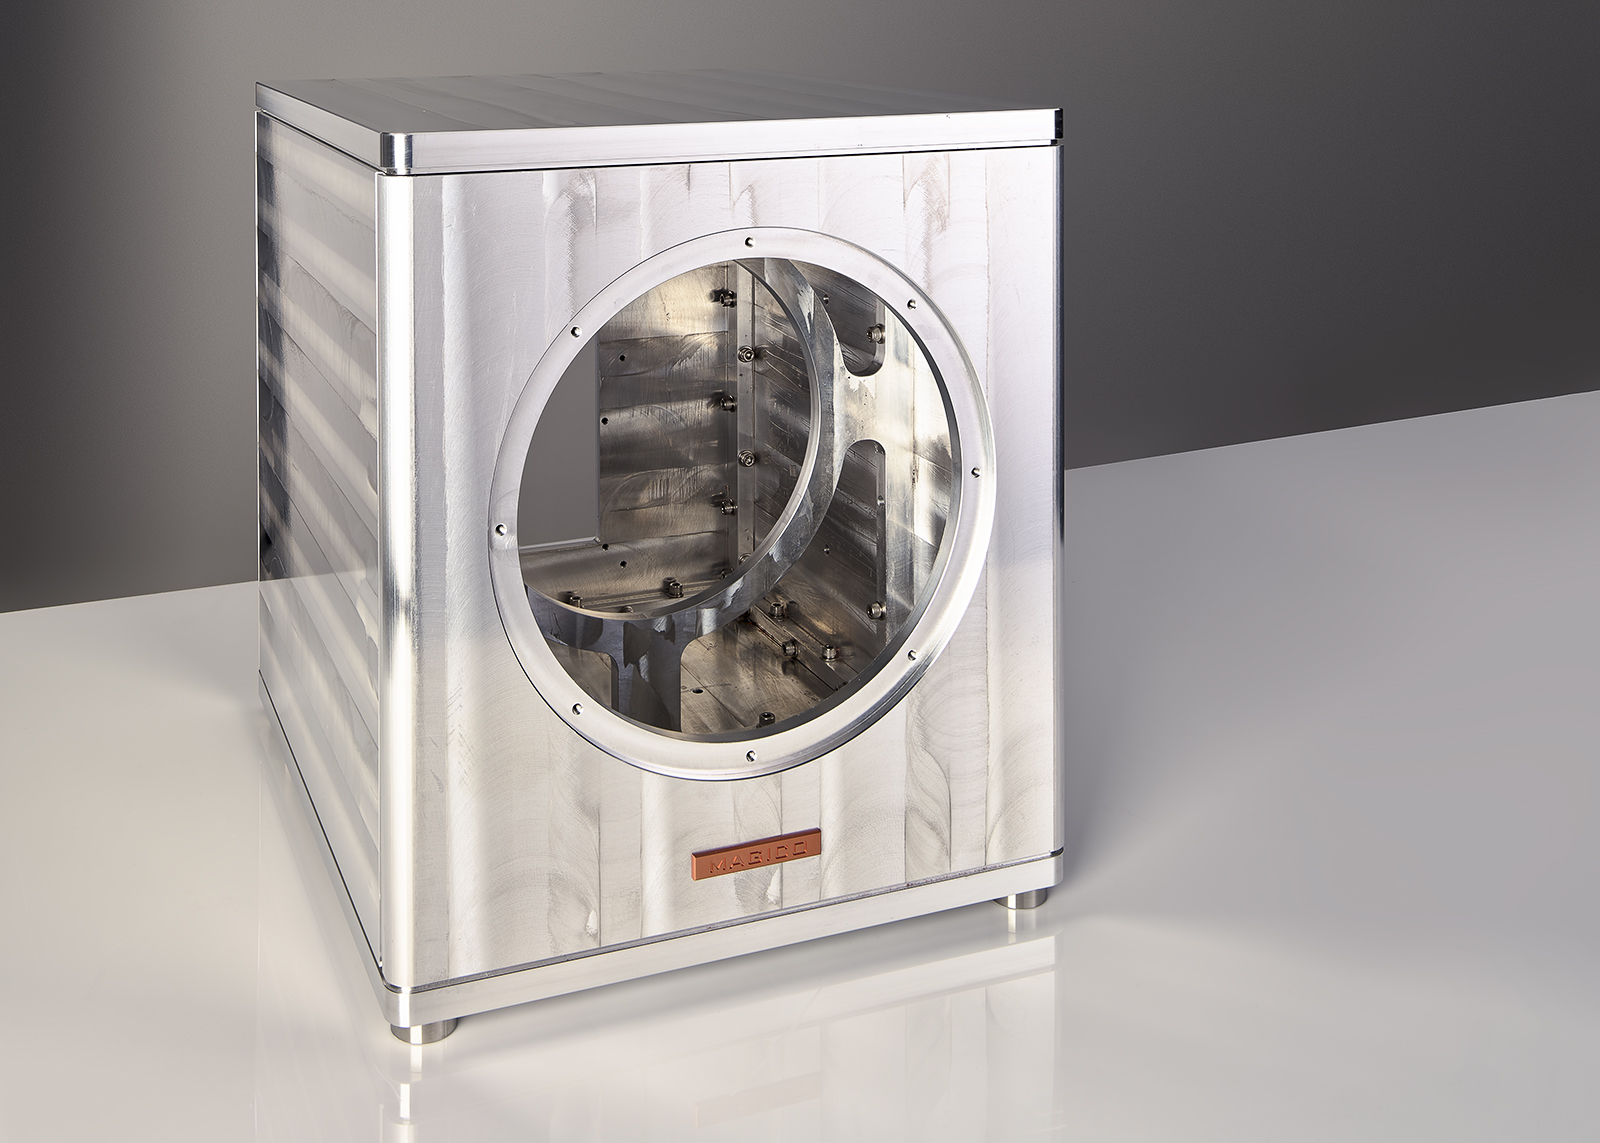
The good news is that Magico’s ASub subwoofer, while not exactly inexpensive, is going to cost you a good deal less than one hundredth of that figure, yet it has much of the same DNA, which includes the fact that, like all Magico speakers, its enclosure is made from 10mm-thick sheets of solid 6061 T6 aluminium that’s internally braced and damped.
But I have even better news.
Magico’s ASub is not only a phenomenally good-sounding, high-performance subwoofer, which has by far and away the best and most flexible room tuning and speaker matching circuitry I have ever seen, it’s also the most fun to use.
Fun? Yep, fun! And lots of it: I have never, ever, had quite so much fun setting up, playing with, tuning and (eventually!) listening to a subwoofer as I did with the Magico ASub.
Equipment
If you have ever read any interviews with Magico’s founder, Alon Wolf, you won’t have to ask whether his ASub is a bass-reflex or a sealed design, because you’ll already know that he’s railed against bass-reflex enclosures for many years, intimating that (and I’m paraphrasing here, based on his spiels at CES show demos) that you “get more boom than bass extension”. But if you want an on-the-record quote, Wolf once told Stereophile’s Jason Victor Serinus concerning bass extension that: “Many audiophiles, including reviewers, are fooled into thinking that most ported speakers extend far lower than they do.”
The latest hi-fi, home cinema and tech news, reviews, buying advice and deals, direct to your inbox.
As for the material the ASub’s cabinet is made from, it is, as I suggested in the introduction, 6061 T6 aluminium. Magico makes much of its use of 6061 T6 aluminium in its advertising and promotional material, but it would actually be surprising if if didn’t use this type of aluminium, because according to the people who actually make the stuff, it’s the most versatile of all the heat-treatable aluminium alloys, being strong, resistant to corrosion, easy to weld, easy to extrude and widely available in a huge variety of sizes and forms. Indeed it’s the second-most popular grade of aluminium alloy.
First developed in 1936, 6061 aluminium is a precipitation-hardened alloy that uses magnesium and silicon as its major alloying elements. The ‘T6’ designation means that it’s 6061 alloy that has been tempered, solutionized and artificially aged, whereas the standard ‘O’ type is not: It’s only annealed. (There is another grade, called 6061-T651, which is not only tempered, solutionized and artificially aged but also stress-relieved.)
6061 T6 aluminium’s most common use is in the manufacture of bicycle frames, but possibly its most unusual use was when NASA used it to create the plaques carried inside the Pioneer 10 and Pioneer 11 space-craft that have pictorial messages in the event that they’re ever intercepted by aliens. These plaques depict the nude figures of a human male and female along with several symbols that are designed to provide information about the origin of the spacecraft (i.e. where we are!) These nudes were the first human-made human images ever to reach interstellar space.
Don’t be fooled into thinking that because it is made from aluminium the Magico ASub does not weigh much. Despite its relatively compact dimensions (it measures just 458x369x447mm) it weighs 49kg which, as the courier who delivered my review sample told me grumpily, “is heavier than my wife.”
But forgetting the weight of the courier’s wife and continuing on with my aluminium theme, or should that be Magico’s aluminium theme (though Magico of course uses the American spelling: aluminum), you most likely won’t be surprised to learn that Magico makes the cone of the ASub’s driver out of… yep, you guessed it, aluminium.
But although the cone is made from aluminium, the very large (120mm diameter) dust-cap at its centre is, I think, made from woven carbon-fibre. Magico claims that many of its cone drivers are so strong that you can drive a motor vehicle over them without them collapsing, but I would not suggest you try this at home.
Magico rates the diameter of the ASub’s cone as “10 inches”, which translates to 254mm (at least it does if you’re weren’t involved in the design of the Columbia space shuttle), but in fact this dimension is actually the distance between the mounting holes across one of the driver’s diameters rather than the overall diameter, or even the Thiele/Small (T/S) diameter.
Confusing though it might be, almost all the world’s loudspeaker driver manufacturers use this same system to specify driver diameter. It would make more sense to use the T/S diameter, which is the distance across the driver from half-way across the roll surround on one side of the driver to half-way across the roll surround on the opposite side.
It would make more sense because it’s this dimension that gives the effective cone area of the driver, technically known as Sd, and it’s the Sd that informs how much ‘grip’ the driver has on the air in front of it. It’s also the dimension that loudspeaker designers plug into their computer programs when they’re designing a cabinet to house a specific driver: They certainly don’t plug in the distance between the mounting holes!
As for that roll surround, it’s a standard inverse profile and appears to be made of some type of rubber compound, so it should be very long-lived. (Driver roll surrounds that are made of foam will inevitably fail at some point in the not-too-distant future.)
If you purchase a standard Magico ASub, you’ll be looking at that driver quite a bit, because the ASub doesn’t come with a front grille. And if you’d prefer a grille, you’ll need to dig out $695, because that’s the RRP.
The data sheet for the Magico ASub rates its internal amplifier with an output of ‘500-watts’ but doesn’t go into any detail about the amplifier’s design. However, seeing that it’s powering a subwoofer it doesn’t need much in the way of bandwidth and out-of-band noise will not be an issue, so it really doesn’t matter what ‘Class’ of amplifier it might be – Class-A, Class-B, Class-A/B… even Class-H – but given the stated power, the lack of any obvious heat-sinking and the fact that the plate ran so cool during all the time I was reviewing the ASub, I’m putting my money on it using a Class-D topology of some variety.
There are two ways of getting audio signals into the Magico ASub, both involving wire. You can input a balanced signal, via a single XLR female socket, or an unbalanced signal, in which case you have the choice of two gold-plated RCA sockets, or both.
Why only a single XLR input but dual RCA inputs? Magico’s logic is that all stereo systems and home theatre receivers have RCA unbalanced outputs and use short cable runs, so unbalanced connections are all that’s required. It anticipates that the XLR balanced input will be used only when customers are running a very long cable to the ASub, as would be the case in very large home theatre systems and professional sound systems. “On more expensive subs we have only two XLR inputs since we almost always have XLR outputs on pre/processors in the matching price-point,” said Yair Tammam, CTO at Magico. “We didn’t see the need for two input XLRs on this product.”
You may be able to tell from the photograph below on this page that there actually are two XLR sockets on the rear panel of the ASub. The second one (a male XLR) is actually an output or, as the label on the rear panel more accurately identifies it, a ‘Through’ socket. This means that whatever signal you input to the ‘Analogue In’ XLR input will appear unaltered at the ‘Through’ XLR output. In other words, it won’t be filtered or modified in any way. This is to allow you to easily and conveniently ‘daisy-chain’ multiple subwoofers. (Magico strongly recommends using two subwoofers, rather than just the one, presumably to more effectively deal with room modes).
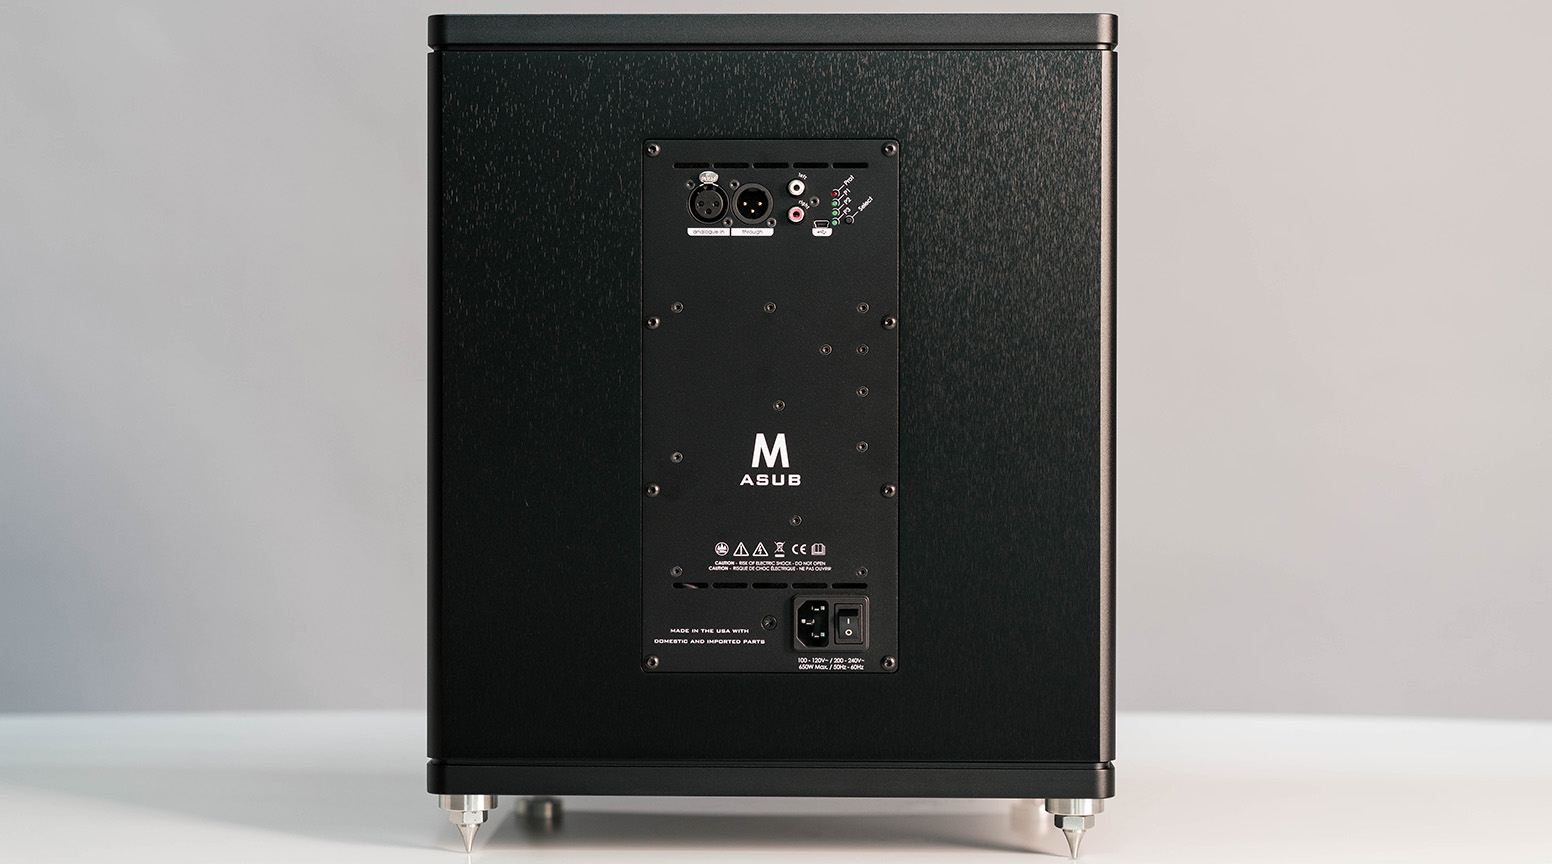
I was intrigued about the orientation of the two XLR fittings.
The female fitting is oriented so the earth pin is the lowest of the three pins, while the male fitting is oriented so the earth pin is the highest of the three. This seems a bit strange, and a tad illogical, but means that if you do use both fittings the XLR plugs will look a bit odd, as one will appear to be ‘upside down’.
Alongside the RCA inputs is a vertical array of four LEDs, plus a small press-button. The topmost (red) LED is labelled ‘Pro’, while the lower three green LEDs are labelled Pre1, Pre2 and Pre3. The press-button allows you to choose which of these three Preset crossover filter set-ups you’d like to use.
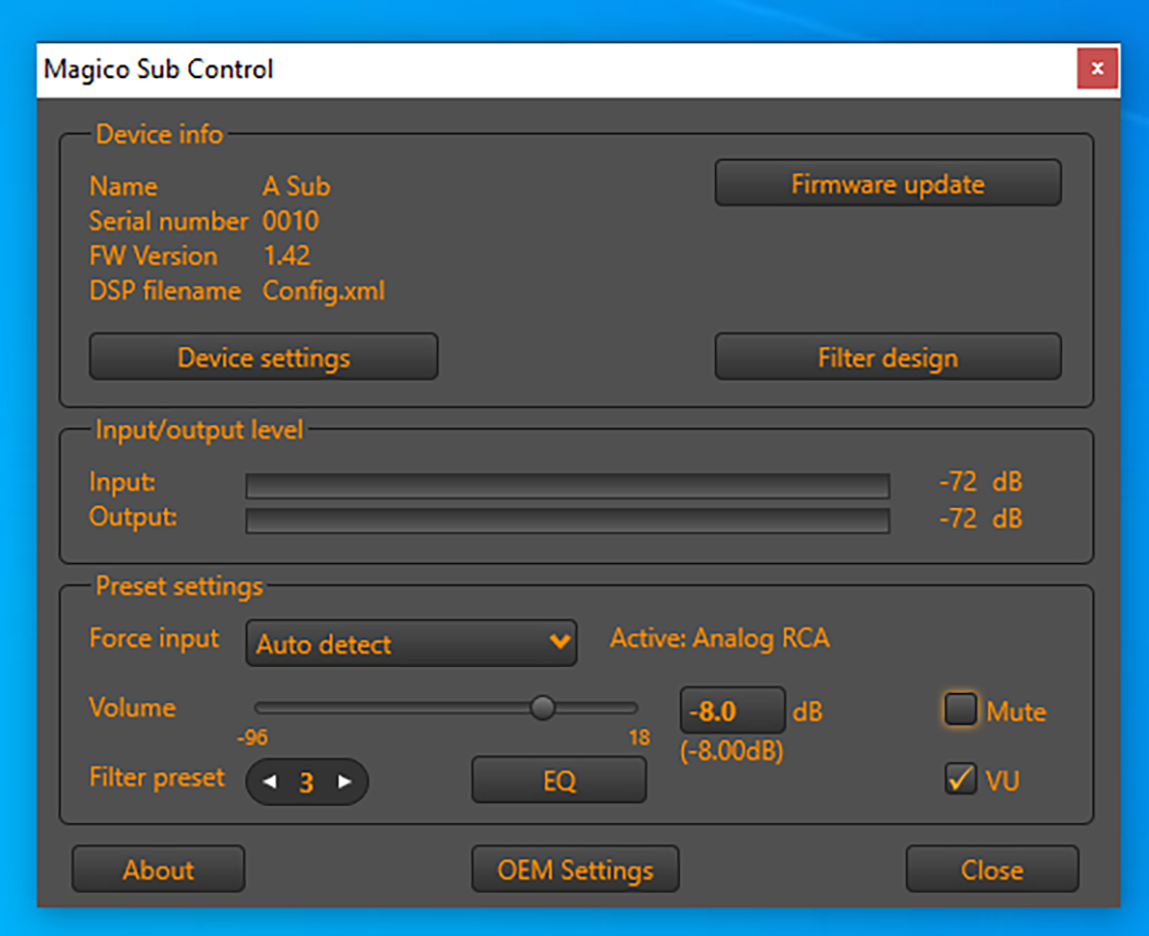
So far, I have not mentioned the elephant in the room here, which is that there are no actual user controls on Magico’s ASub. No volume control, no low-pass filter control, no phase control… no nothing. This is because you have to use a computer to control it, for which Magico provides a ready-made software package that it supplies on a USB stick.
That said, you can actually get up and running with the ASub straight away without having to connect a computer at all, because the three presets all come factory pre-programmed with an 80Hz, 24/dB/octave low pass filter. However to do this you would have to be able to control volume level externally, because there’s otherwise no way to do it without connecting a computer. Computer connection is via a USB Type A mini-jack, a type that seems a bit outdated these days. I would have thought for such a premium product, USB-C would have been a better choice. I was also perplexed as to why Magico puts exactly the same filter on all three presets. I really think that two should each have a completely different filter, and the third should have no filter at all.
Preset 1 should come with a 50Hz low-pass filter (which would be perfect for the Magico A3). Preset 2 should come with a 60Hz low-pass filter (which would be perfect for the Magico A1) and Preset 3 should not be filtered at all, to cater for those who will use their AV receiver’s crossover software to pre-filter any signals sent to the ASub.
Pre-programming the filters in this way would be very, very easy for Magico to do, and Australian Hi-Fi editor Greg Borrowman says he has discussed it with the company already, so don’t be surprised if it has been done by the time you read this. But if it hasn’t, never fear, because it’s super-easy to do yourself… or at least it is once you know what you’re doing.
Computer control
The software Magico provides on its USB stick is a customised version of software originally developed by famous Netherland-based company Hypex to control various of its Class-D amplifiers, one of which is obviously what powers the Magico ASub. I am not giving away any company secrets here, because you will be informed of Hypex’s involvement as an integral part of the software installation process. When your Windows user account controller asks if it’s OK to install the ASub software on your computer, it not only shows the program name as “Magico Sub Control Installer” but also the name of the Verified Publisher as “Hypex Electronics BV.”
The installation process is rather arcane, so unless you get your hi-fi dealer to do it for you (which I’d recommend) you will certainly have to use Magico’s “Quick Set-Up Guide” to do it. This actually wasn’t on my USB stick but apparently will be by the time you are reading this review.
The version I received after asking for it appeared to me as if it was an early draft rather than a finished work, because the descriptions in it didn’t really reflect what I was seeing on-screen during the installation and filter set-up processes and some essential steps were incompletely described.
After a few emails I was then sent a video that walks the viewer step-by-step through the entire installation process, after which I had no trouble finishing the install… though adding a voice-over to the otherwise silent video would have been a nice touch. I understand this video also will in future be included on the USB stick that comes with the ASub. Again, if it’s not there, ask your dealer for a copy.
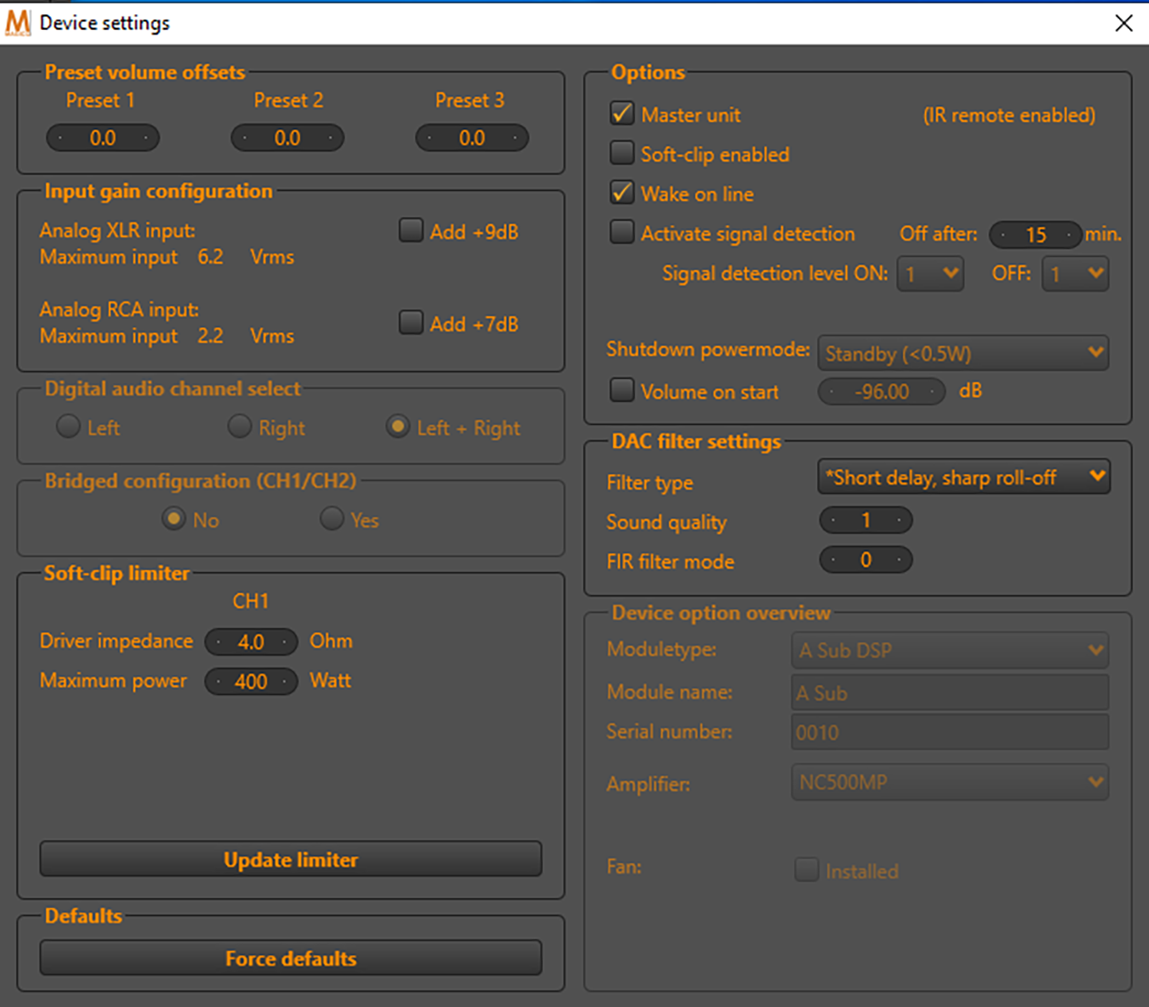
Low pass filter
To ensure correct crossover from the ASub to your main speakers, you need to set the ASub’s low-pass frequency and phase, both of which are usually achieved via rotary controls. On the ASub, the easiest way to do this is load a config.xml file from the Resources Folder on the USB stick.
This will load a preset filter, the turnover point of which will be indicated by a blue dot. Clicking on this will turn the dot green and a small box with “BQ1 on/off” and “BQ2 on/off “will come up. Click on BQ1 and a dialogue at the left of the screen will open to show you the frequency at which the filter is currently set. You then just then type in the frequency you want into the “Cut-Off Frequency” box (say, 90Hz) and press “Return”.
The blue dot will then move to 90Hz and turn green. You will then see a second blue dot appear back at the 80Hz vertical. You then need to click on this second blue dot and repeat the process just outlined. This is because what you’re actually doing is constructing and joining two separate 90Hz 12/dB octave filters to create a single 90Hz 24dB/octave filter. Once you’ve done this, you click anywhere on the page and you’ve made your filter.
However, in a trap for new players, you have neither saved your filter, nor actually loaded it into the subwoofer.
Load or save? I’d recommend doing both.
Save it using an obvious filename (e.g. “90Hz LP filter 24dB per octave”), then just click the “Load filter to DSP” button and you’re done – the 90Hz filter will be loaded into Preset 1. You could then repeat this entire process, but set the low-pass frequency to 100Hz low-pass, save it as such, but load it into Preset 2. Do this and then whenever you press Preset 1 on the rear panel of the sub you’ll load your 90Hz filter, and whenever you press Preset 2, you’ll load your 100Hz filter. After this you’ll have no more need for the computer (unless you want to change volume). It’s really that easy.
More advanced users might want to add extra filters (such as a high-pass filter in order to remove frequencies below, say, 30Hz, so you could use the ASub late at night and not upset the neighbours. (Settings such as this are sometimes called ‘Apartment Mode’, or ‘Night Mode’).
You can also adjust filter slope, Q, phase, in fact pretty much any parameter of the filter you like, and everything you do will be shown graphically on your computer screen. Like I said, it’s not only flexible, it’s fun!
But if you’re not a fun kind of guy, and you like your filters to come ready-rolled, it has been suggested to Magico that it should think about creating and loading a complete set of ready-made filters with different turnover points into the Resources folder on the USB stick to make it even easier to do. But it would not be nearly as much fun.
Parametric equaliser
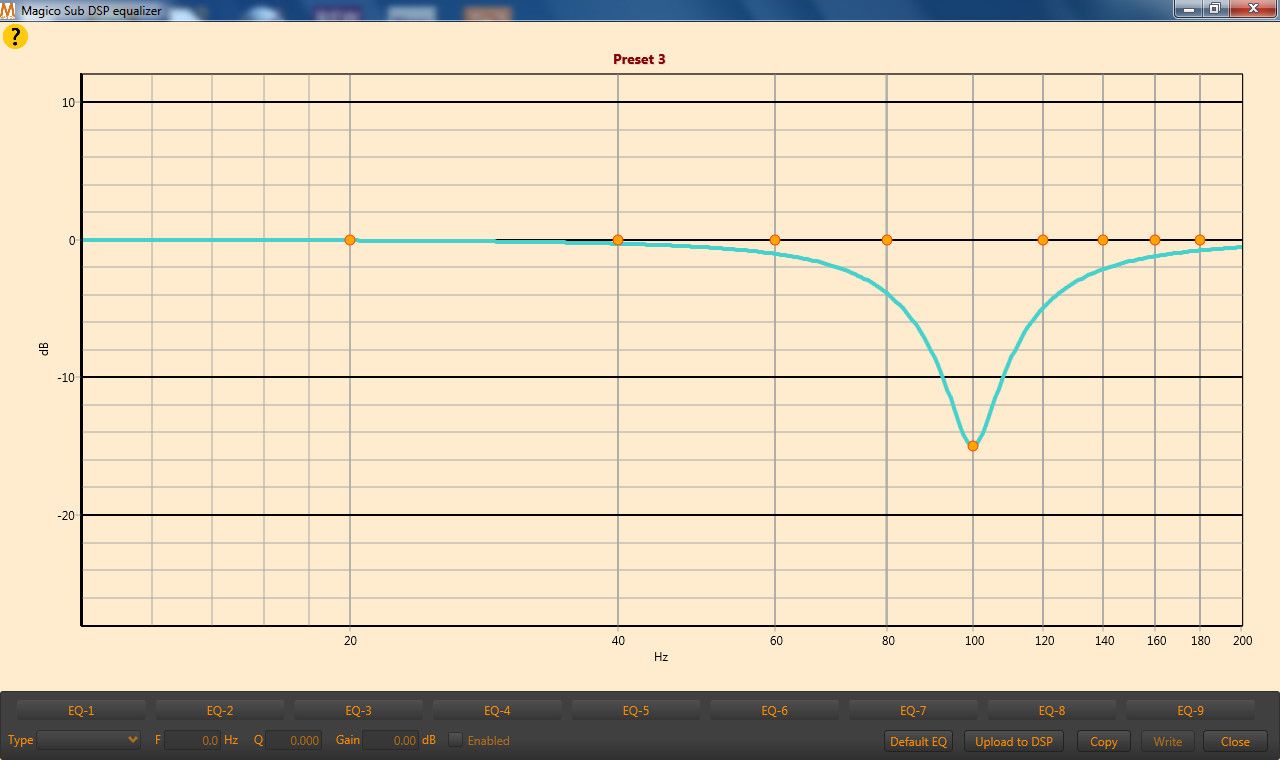
In order that you can take advantage of the extremely powerful DSP processing inside the Magico ASub to compensate for any deficiencies in your room’s acoustics, the ASub has a nine-band parametric equaliser built in, which you access by pressing the “EQ” button on the Magico Sub Control Screen.
Initially the nine equaliser bands are set at 20Hz, 40Hz, 60Hz, 80Hz, 100Hz, 120Hz, 140Hz, 160Hz and 180Hz, but you can change these frequencies to whatever frequency you like to suit the correction curve you want to use. You can do this by ‘click and dragging’ to the frequency you want, or by clicking followed by keyboard entry.
If, for example, you find your room has excess energy at 85Hz so you want to reduce the volume level the ASub delivers at this frequency, you’d change the 80Hz filter to 85Hz, then enter the reduction in level you wanted (–6.5dB, for example), then set ‘Q’ of the filter to adjust how much the frequencies either side of 85Hz will be affected (large numbers for a steep-sloped filter, low numbers for a shallow-sloped filter).
The shape of the filter you’ve designed will then be shown on the computer screen, so you will easily be able to see which frequencies the filter affects, and by how much each one is affected. The screenshot of the filter page shown below shows a notch filter that has been created to deliver a 12.5dB notch at 100Hz. The effect this filter had on the Magico ASub’s response is shown in Graph 4 in the Test Results section of this review.
Of course in order to adjust the parametric equaliser, you need to know which frequencies you need to attenuate (reduce) and by how much. This means you will need to measure the subwoofer in your own room. (And remember that you should always be using the EQ to attenuate, not to boost!)
Magico suggests you should do this by purchasing a microphone and installing in your computer a free loudspeaker measurement program called Room EQ Wizard, (the name of this program is usually abbreviated to just ‘REW’). If your computer does not have a suitable soundcard, you will need to purchase a suitable external USB audio interface as well. This REW software not only allows you to measure the ASub’s in-room frequency response, but also to create a filter that will correct for it which can then be loaded directly into the Magico ASub.
This all sounds like a great idea – and it is a great idea! – but my personal opinion is that if you are not already familiar with the theory and practise of loudspeaker measurement it would be necessary to put some time and effort into becoming conversant with REW before you would be able to make useful measurements in order to create suitably effective equalisation curves for the ASub.
However, if you watch the Magico video I mentioned earlier, it will take you step-by-step through the entire measurement and curve-creation processes, so you’ll be able to judge for yourself how difficult you might find it to do simply by watching the video. And if it turns out that you are at all uncertain about your ability to do it, you could then instead ask your hi-fi dealer to do all the measurements and equalisation for you.
But I’d also suggest you could use another method entirely, which is to do it manually, using a real-time analyser app on your mobile phone – either Music & Audio’s AudioTool (Android) or Studio Six Digital’s AudioTools (IOS) – and a pink noise source (www.audiocheck.net/testtones_pinknoise.php) which will allow you to adjust the filters and equalisation in (almost) real time. Admittedly this method isn’t as slick or accurate as the one Magico recommends, but it’s cheap, accurate enough and possibly a bit easier to do.
Listening sessions
I have to say that initially I was a bit put out that the ASub was not equipped with a physical volume control but once I became more familiar with the software, and had everything up and running, I realised I had no need to use the control at all, either when the ASub was installed in my two-channel audio system or when it was installed in my multi-channel home theatre system.
Once you have calibrated it, there is no further need to make any adjustments. And if you do prefer to use slightly different settings for movies than you do for music, you could simply make those settings in advance, then program them into the presets. But if you didn’t want to fiddle with the presets, you can adjust volume by connecting a computer to the ASub and using the main screen to adjust it.
If the computer you connect is already switched on and loaded with Magico’s software (which it would have to be, of course!), you could use it to adjust volume in less than 60 seconds. Incidentally, there are no restrictions on the number of times you can install the software, so you could leave an older computer permanently connected to the ASub if you wanted instant access. But like I said, I can’t see why you would.
However, if you follow Magico’s recommendation, which is to use your AV receiver’s LFE circuitry to adjust the volume of the signal going to the ASub (as well as take care of filtering, etc), you can ignore my previous two paragraphs entirely, because you will have total control of the Magico via your AV receiver and its remote control.
I always like to start my subwoofer evaluations with a Bach organ work, so because it hadn’t had an outing for a while, I dropped the stylus on his spritely Fugue in G Major (BWV 577). OK, so it doesn’t quite have the bass of his famous Toccata and Fugue in D Minor or even his gorgeous Passacaglia in C Minor, but it’s a lovely work, and there’s a goodly assortment of 16-foot pipes in the finale.
The advantage of it being a gigue is that it was able to prove to me the speed and transient abilities of the Magico ASub, and I can report that the ASub performed brilliantly. I heard instant responses to both keyboard and pedals, with no unwanted overhang whatsoever and when the 16-footers did come in at the end, the depth and quality of the low bass was impressive.
Of course you don’t have to be a pipe organ aficionado to benefit from the extended bass afforded by adding a subwoofer to your system. All the lower notes of the larger orchestral instruments will be improved by using a subwoofer (percussion, harp, double-bass, cello, and so forth) and when playing rock, jazz and other popular genres, the sound of drums, bass guitar, electric guitar, and all keyboards will also benefit.
You can demonstrate this for yourself with a track you’re bound to have in your own collection, which is Speak To Me/Breathe from Dark Side of the Moon. Those ‘heart-beats’ are at a frequency of 27Hz. You’ll probably also have Jennifer Warne’s Famous Blue Raincoat in your collection, so listen to the Magico ASub playing Joan of Arc, and revel in the quality of the low bass at 35Hz.
If you’d rather experience the Magico’s superior bass performance with a movie, it’s worth digging out Steven Spielberg’s version of H.G. Wells’ War of the Worlds if only for the scene where the Martian machine emerges. The ASub delivers this sound effect with startling realism, as it then also does with all the FX later on in this movie, including the death rays and the plane crash.
And if you haven’t experienced the Lightcycle Battle, from Tron:Legacy, you owe it to yourself to experience it with the Magico ASub. Do watch the volume levels, but be prepared to be seriously impressed. The tympanic bass line and the pulsing super low frequencies add to the battle sounds to deliver a sonic masterpiece.
Verdict
I know that I have already said it once, but Magico’s ASub is just so good that I just have to say it again: it’s not only a phenomenally good-sounding, high-performance subwoofer, and one which has by far and away the best and most flexible room tuning and speaker matching circuitry that I have ever seen, it’s also the most fun of any subwoofer I have ever reviewed. But I don’t want one... no, no, no... I want two!
Full lab test results
Newport Test Labs first measured the frequency response of the Magico ASub using a near-field technique that effectively gives the response that would be obtained in an anechoic chamber, without the contribution of room effects. This technique does however, remove the beneficial effect of an in-room response, which is a boost in volume level at the very lowest audio frequencies.
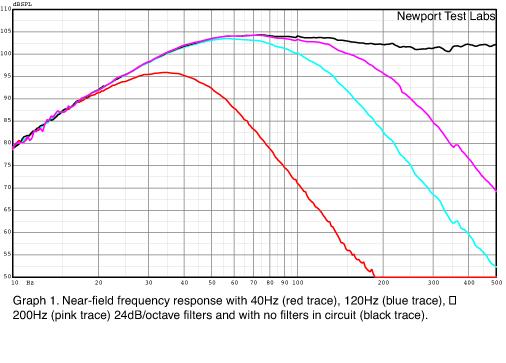
Graph 1 shows the result of this test for three different filter settings and for when no filter is used at all. Looking first at the unfiltered response (the black trace) you can see that it is superbly linear, extending from 35Hz to 500Hz ±2dB. Below 35Hz the low-frequency response rolls off at 12dB per octave, exactly the slope loudspeaker enclosure theory predicts for this alignment. I should point out that despite this exceptionally linear and extended high-frequency response, you should always roll off the Magico ASub’s response at 200Hz or lower, so the sound is not too directional.
The pink trace on Graph 1 shows the Magico ASub’s frequency response when the low-pass filter is set at 200Hz and you can see that relative to the driver’s output at 60Hz, the response is around 9dB down at 200Hz. The light blue trace shows the response with a 120Hz low-pass filter and relative to 55Hz the response is around 6dB down. If you look at the slope of the response resulting from this filter between 200Hz and 400Hz (which is one octave) you can see that the slope is exactly 24dB/octave. The red trace on Graph 1 shows the response with a 40Hz filter and you can see that response rises to a maximum output at 35Hz before rolling off, putting the overall frequency response at this setting as 17Hz to 55Hz ±3dB.
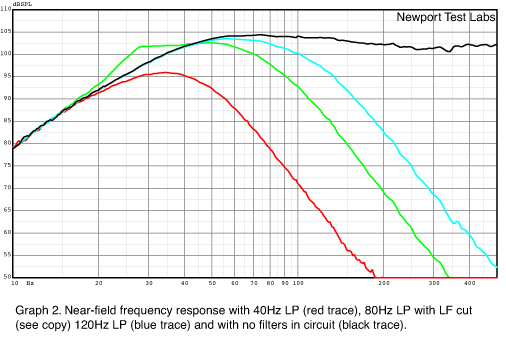
Graph 2 shows three of the same traces that are shown on Graph 1, but the green trace shows the response with an 80Hz 24dB/octave low-pass filter and a 27Hz shelving filter. The shelving filter could be used to attenuate super-low frequencies to avoid them transmitting to another dwelling.
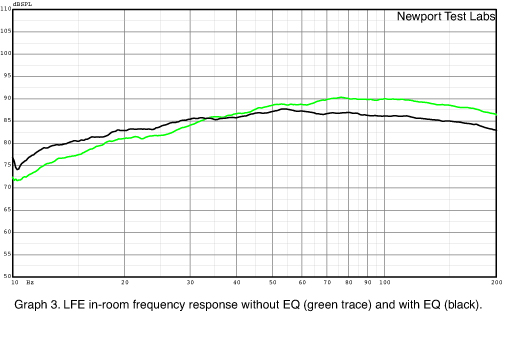
The in-room response of the Magico ASub, measured at a distance of three metres without any filters or equalisation, is shown in Graph 3 (green trace). This time Newport Test Labs has used an upper measurement limit of 200Hz as this is a little higher than the maximum frequency you’d normally expect any subwoofer to deliver. You can see the in-room response even without equalisation to compensate for room effects is very smooth, extending from 30Hz to 200Hz ±3dB. When equalisation is added, the response becomes even smoother and even more linear, which is shown as the black trace. This response extends from 18Hz to 200Hz ±2.5dB.
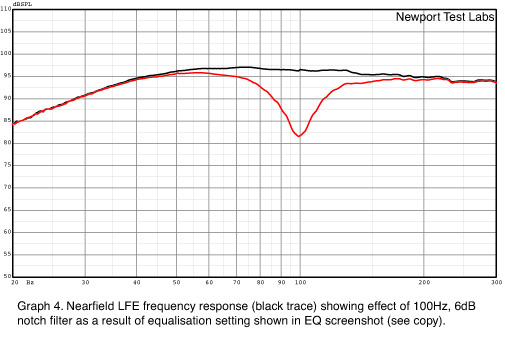
Graph 4 shows the frequency response of the Magico ASub without any filters or equalisation (black trace) and with a filter with a centre frequency of 100Hz, attenuation of –6dB and a Q of 12. The setting of Magico’s equaliser that was used to obtain this graph is shown in the screenshot published earlier in this review. It’s a very good demonstration of the power and accuracy of the software.
Self-evidently, the frequency responses returned during Newport Test Labs’ tests were outstandingly good, easily exceeding Magico’s specifications, but these same frequency responses also show the enormous power and flexibility of the digital filtering and equalisation enabled by Magico’s software-driven DSP module.
In sum, the Magico ASub offers more effective room tuning and equalisation than any subwoofer I have ever seen, irrespective of size or price.
Australian Hi-Fi is one of What Hi-Fi?’s sister titles from Down Under and Australia’s longest-running and most successful hi-fi magazines, having been in continuous publication since 1969. Now edited by What Hi-Fi?'s Becky Roberts, every issue is packed with authoritative reviews of hi-fi equipment ranging from portables to state-of-the-art audiophile systems (and everything in between), information on new product launches, and ‘how-to’ articles to help you get the best quality sound for your home.
Click here for more information about Australian Hi-Fi, including links to buy individual digital editions and details on how best to subscribe.
