
So, you've bought a new LG C3 or G3 OLED TV, have you? Congratulations – you're now the proud owner of one of the best TVs that money can buy.
The only problem is that, as with all TVs, LG's OLEDs don't come out of the box performing at their best, primarily (but not purely) because strict regulations mean they are pre-set to their most eco-friendly, lower-quality picture settings.
Thankfully, these TVs are also among the easiest in the world to get looking their best, though it's not always clear which settings need changing and which should be left alone. That's where we come in: we've extensively tested both the C3 and the G3, as well as every previous generation of LG OLED and more or less all of the flagship models produced by every other major TV manufacturer, so we know exactly what needs to be done.
Before we get started, it's always worth remembering that there's no single best way to set up your TV. It is your TV after all, and the most important thing is that you like the way it performs. The idea of this short guide is to help you make sure that your new TV isn't being held back and is geared towards delivering cinematically authentic picture quality without much in the way of active processing. For many people, it will be all they need to do; for others, it can be a jumping-off point from which they can experiment with the TV's various picture-processing features. Whichever camp you fall into, we hope you find these tips useful.
1. Avoid the AI Picture Pro and AI Sound Pro features

As part of the C3 and G3's first-time set-up, you'll be asked whether you want to enable the AI Picture Pro and/or AI Sound Pro features. These use LG's most advanced processing to optimise picture and sound quality, and the demo image and audio clip that LG presents you with in order to illustrate their effectiveness is very compelling. However, we recommend that you leave them switched off – at least at this stage.
To our ears, the AI Sound Pro feature sounds poor this year and is best avoided altogether, but we can imagine that some people might find value in AI Picture Pro, particularly its auto-brightness element, which adjusts the brightness of the TV to account for how much ambient light is in the room. The problem is that the AI Picture Pro setting enables a number of AI features together, and we feel that you, a) are better off starting with a minimally processed base from which to work and, b) will find it easier to try these settings one by one, rather than experiencing them all working together at once.
For what it's worth, we also feel that the C3 and G3 TVs simply perform best with these features switched off, even in a home environment, but we recommend that you try them for yourself – albeit after you've followed this guide to get to that balanced starting point.
If you've already been through the initial set-up process and want to turn these features on (or off) after the fact, go to Settings > General > AI Service and disable whichever AI settings you prefer.
2. Make sure you're using the latest software

While the C3/G3 will tell you about the built-in auto-update setting at the end of the first-time set-up process, it won't necessarily immediately download and install the latest software, which requires a restart of the TV. Therefore, before you go messing around with any settings, we recommend that you manually check for and install any new software that's available.
To do this, go to Settings > Support > Software Update
3. Switch to Filmmaker Mode

Out of the box, your new C3 or G3 will be in its Auto Power Save mode, which unfortunately isn't great for picture quality. We recommend that you instead switch to the Filmmaker Mode preset. It might not be the perfect picture mode for everyone, but it is the most authentic of the presets and the one with the least active processing, so it's a sensible place to start before tweaking for personal preference later.
Go to Settings > Picture > Select Mode > Filmmaker Mode
4. Reduce Sharpness

In Filmmaker Mode, Sharpness is set to 10 (out of 50) by default. That’s a very subtle amount of added sharpening, but it is still added sharpening. For true authenticity, you should reduce this to 0. Again, you can always change this setting again later if you wish.
Go to Settings > Picture > Advanced Settings > Clarity > Adjust Sharpness and drop the slider all the way to the bottom.
5. Change the TruMotion setting

It's well worth taking at least a quick look at the TruMotion motion processing feature at this point. By default, it's off entirely in the Filmmaker Mode, and we recommend switching to Cinematic Movement.
This is specifically designed to reduce the judder you get from 24p content without applying 'proper' motion processing. To our eyes, it’s all gain and no pain, though some purists will prefer to leave it off entirely.
Others might prefer the Natural setting, which adds a little more smoothing while largely remaining free of the soap opera effect and fizz around motion. It’s a personal preference thing, but we think Cinematic Movement is the best starting point.
Switch to it by going to Settings > Picture > Advanced Settings > Clarity > TruMotion
6. Apply to all inputs

The changes you've made to Filmmaker Mode will only apply to the source that's currently selected, whether that's one of the four HDMIs or a streaming app. The last thing you want to have to do is manually make these changes several times, so instead simply click the 'Apply to all Inputs' option, which will copy your customised version of Filmmaker Mode across to all sources.
The button is in Settings > Picture > Advanced Settings
You might conceivably one day want slight variations to your picture settings when in different inputs – but, for now, having a consistent baseline seems most sensible.
7. Tweak HDR settings

The changes you've made so far will only apply when watching SDR (standard dynamic range) content, so when you switch to watching something that's in HDR, you'll be back to the TV's default picture settings.
If the content is in HDR10, simply make sure you've got the Filmmaker Mode preset selected and then make the same changes to Sharpness and TruMotion that we outlined above.
If it's a Dolby Vision show or movie, the Dolby Vision Cinema Home preset should be pre-selected. This is a brighter, punchier version of Dolby Vision that's really intended for viewing with the room lights on, but we appreciate its approach even in a dark room. Purists may want to switch to the dimmer but even more authentic Dolby Vision Cinema preset. Beyond that, you shouldn't need to make any extra adjustments for Dolby Vision content.
8. Turn off Energy Saving
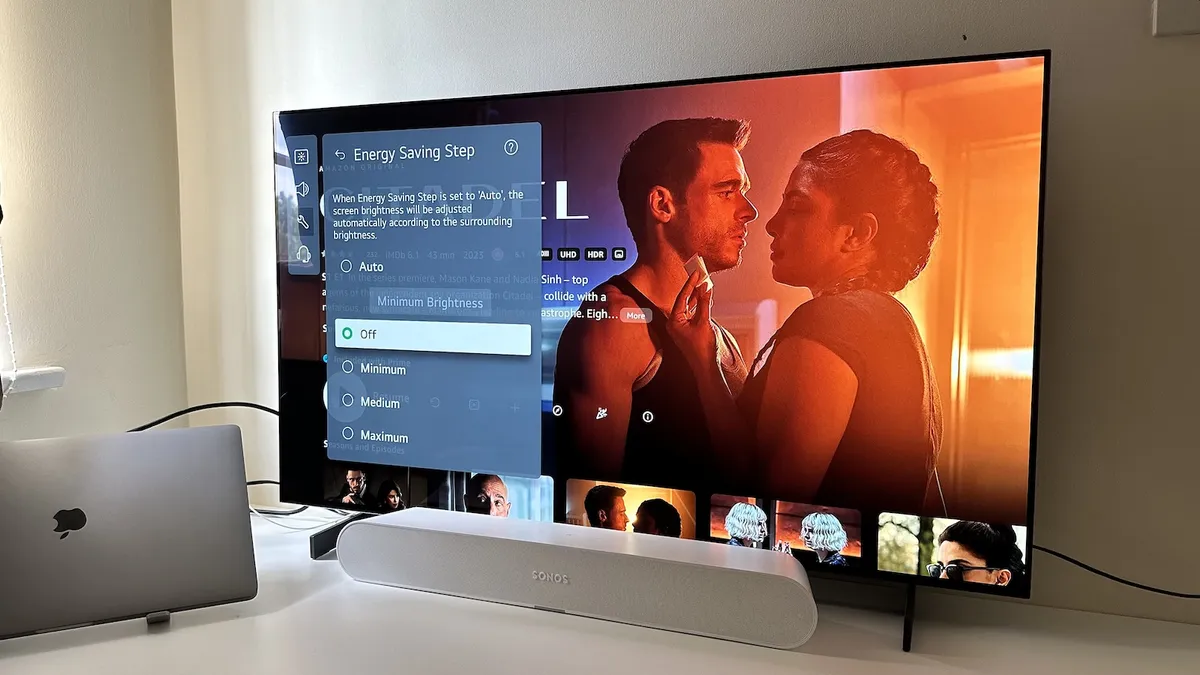
It's now time to take a look at the Energy Saving menu. There’s an option here called Energy Saving Step, which is set to ‘Auto’ by default. This means the set will automatically adjust in brightness depending on how much light is in the room.
That might sound like a useful feature but, in our experience, it’s always at least somewhat hampering picture punch, so we recommend turning it off. This does mean the set will consume more energy but there seems little point to us in buying a high-performance TV if you're going to limit that performance.
A good compromise might be to turn this setting on and off depending on to what degree the quality of whatever you're watching matters. You can add the Energy Saving Step setting to the TV's Quick Menu for easier access if this is the approach you want to take.
To find the setting in the first place, go to Settings > General > Energy Saving > Energy Saving Step.
9. Take a look in the OLED Panel Care menu

Finally, it's worth familiarising yourself with the options in the OLED Panel Care menu, which are designed to reduce the risk of burn-in. The important options are Screen Move and Adjust Logo Brightness, which by default are set to On and Low respectively.
Most people will never notice them in action so we suggest you leave them on at first, but if you do spot any odd behaviour (picture elements dimming when they shouldn’t, for example), you could consider turning one or both settings off – though do bear in mind that the possibility of burn-in will rise slightly as a result.
MORE:
These are the best TVs you can buy right now
Don't know which one to buy? Here's our LG G3 vs C3 comparison
And these are the best TV deals you'll find anywhere on the internet

