Well, that was a palaver. Since my iMac has my entire life on it - from eight years of photographs to 10,000+ ripped tracks to the odd CV (well, you never know when you're going to need it) - you may have heard my whimpering when my hard drive died a couple of weeks back. And my last backup was about a year old.
Luckily, a trip to the Kingston Genius Bar seemed to revive it for (just) long enough to take a full Time Machine backup, so I was feeling calm enough to take stock and get it sorted.
Article continues belowFirst, a quick inventory of the things you'll need:
First thing's first. In order to get the casing apart, you need to remove the memory cover on the bottom.

And yes, it is downhill from here. Although to be fair, the one thing that I was terrified of doing turned out to be the easiest; removing the front glass. I had no idea that it was held on with magnets until all this happened, but general consensus seems to be that you're better off getting a proper suction tool like the one I bought in order to pull off the glass. Get it wrong and it can break or you can shear off the guiding pins which hold it in place. So this was the point where I was crossing my fingers and hoping not to be calling the Repair Centre in the morning...

A swift tug straight up, however, and off it came. So to speak.

So far so good. Next thing to do is to remove the aluminium front plate. There are 12 T8 Torx screws round the frontplate.

Take all these out. Don't worry about the front falling off, I think the fit's too tight for it to happen. Do note, however, that they're not all the same size :). The four at the bottom edge of the screen are a bit longer than the others, so remember that when you're trying to put it all back together again and wondering why they don't fit.
Next, the front has to come off. I think prising it from the top edge is best, but be careful - at the top edge of the screen is a small cable which connects the iSight camera to the front plate. Sadly, it's not quite long enough for the frontplate to sit on the table, so you need to unplug that cable with your other hand, or ask a glamorous assistant to do it for you.

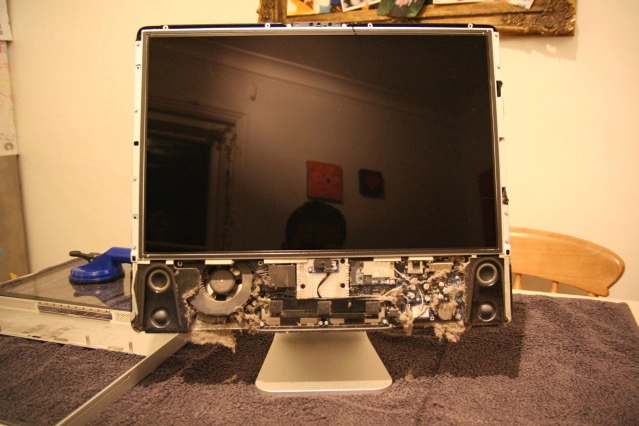
And so we have a naked iMac:
Not just naked, however, but dirty...
Now I never thought I'd find myself writing this, but this is where the paintbrush and the hoover came in. I started with just the paintbrush, but fluff started getting all over the screen so I whipped out the Dyson and had that running a little way away from the delicate innards while I brushed all the grime away from the circuit boards visible under the screen. It was at this point - though not the last - when Miss JD came in and said "is it working yet?" and violence was only narrowly avoided...
Curses. I've just realised that I didn't take a picture of the next bit, which is unfortunate because it was the one bit of the Googled instructions which I found a bit vague. I'll just have to try to be as clear as possible, but be warned – here is where you may need your glamorous assistant again.
The screen is encased in an aluminium 'frame', which has four T8 screws on either side, outside the thin black rubberised strip which surrounds it. Take those out and prise the screen out.
The screen is attached to the motherboard etc. by six - count 'em - cables. One is a tiny little black one which is curled round the edge of the fan you can see in the bottom left of the 'naked iMac' picture.
I'd suggest you remove that before you take the screen out, but there are so many cables down there it might be difficult to identify without finding which one is preventing you from removing the screen. Whichever, take that one out first (each of these cables bar one has little plastic plug connectors so is easy to do).
On the left hand side (looking from the top of the iMac down, there are four cables (it looks like two to begin with):

That's two of the cables; another pair are further down, below the optical drive. Now, the cables attached to the screen end are clearly different; one has a pink cable and the other a blue.
However, the ones attached to the Mac end are not identifiable, so I tied something round one of them to make sure I knew which one went where when I was plugging it all back in. Repeat that for the other two, and then for the last tricky bit.
Strapped across the back of the screen is a thick black ribbbon cable. I had to leave this attached, because it doesn't appear to come away from the screen, and the other end is Torxed onto the board, and the screws are a different size from everything else.
But if you carefully remove the tape that holds the ribbon cable onto the screen, you can flip the screen over to the left and lay it face down on the table.
You can just about see the ribbon cable on the left here, connecting the now-removed screen back to the board (above the pink post-it note):

Nearly there. The hard drive is in the middle:

Now, you have to remove three cables; power, SATA and the heat sensor. The heat sensor is the one on top of the hard drive covered in foam; peel it off gently and it will retain enough stick to put back on when you get the new hard drive in.
Before removing the other two, you need to prise the hard drive out - there's a black bar at the bottom of the drive which just needs unclipping, and you can pull the hard drive out, front first. This will then give you sufficient room to remove the SATA and power cables which are over on the right of the picture.
You should now have in your hands a hard drive \o/. Note that there's some furniture on the old hard drive that you're going to need; the black bar at the front which s held on with Torx screws, and two little 'nipples' at the back which you will need to unscrew using pliers:

Put these in the new hard drive, plug in the SATA and power cables, and snap it into place. Stick the heat sensor back where it was, cover it with the foam, and follow all the instructions above backwards to reassemble. Et voilà!
Well...not quite. There are a few things to note on the way back which might help you. Firstly, the iSight camera lead is a bit fiddly to push back, and my first attempt had it blocking one of the Torx screwholes. I then noticed, however, that there's a slot on the front casing which the cable can fit through.
If you push both ends of the cable through it before reconnecting, fit the frontplate and then connect the two ends and push it back into place, it should be much easier.
Secondly, you'll need to be quite assiduous with cleaning the screen before you put the glass back on; mine got very mucky in the process and a good wipe with the microfibre cloth was required before putting the glass back on.
And that's it. Next, of course, came my attempts to restore the contents of my old hard drive onto the new one. I will, however, cut a long story short - Don't Use Time Machine. It's rubbish.
Make a bootable copy of your hard drive using SuperDuper! or Carbon Copy Cloner. Either of these (I can vouch for CCC, though others swear by SD!) allow you to boot up from an external hard drive and copy across the contents, which Time Machine won't allow you to do. As I've just learned to my cost. Now where's that Snow Leopard disc...
