
A Dolby Atmos soundbar is a great way of levelling up your TV's audio if you don't have the budget or space for a full home cinema system.
You probably already know that though, don't you? That's why you've already bought your soundbar and found your way to this page, keen to make sure you're new prized possession isn't being pegged back by an error in set-up.
It's a good thing you're here, too, because while soundbars, even of the Dolby Atmos variety, are very straightforward compared to AV receivers and Atmos speaker systems, there are a few common mistakes that a lot of people make. Read on to ensure that you don't do the same.
(On the off chance that you haven't bought your soundbar yet, check out our best Dolby Atmos soundbars page. You'll also find the latest deals on some of our favourite soundbars below)
1. Don't put it in the wrong place
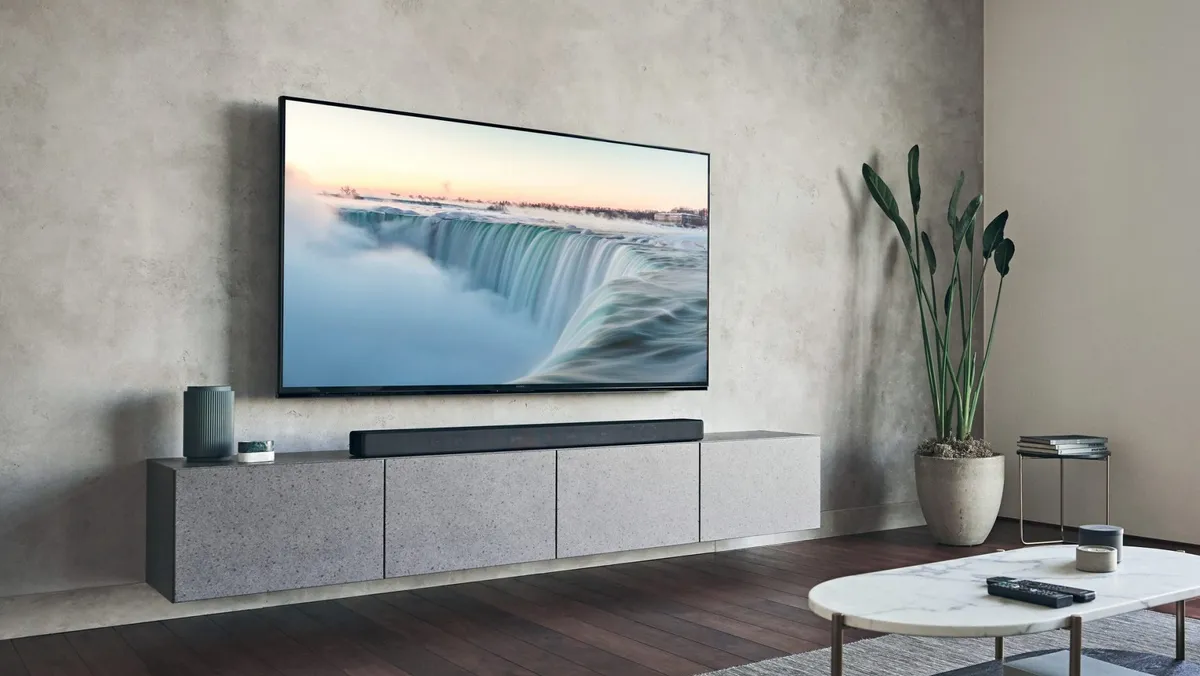
While it might be tempting to neatly tuck your soundbar away in a media unit or cabinet, we really wouldn't recommend it. We've established that these soundbars use directional speakers and software, so blocking them would almost entirely defeat the point of having an Atmos soundbar in the first place.
Placing your soundbar on a lower shelf or in a confined media unit cupboard will obstruct the speakers, so its best to place it on top with your TV, as demonstrated in the above image. However, its also important not to place your Atmos soundbar too close to your TV, as the upward firing sound may bounce off the screen instead of the ceiling as intended, so try pulling it slightly away from your TV if you have the room.
The general rule of thumb is to give your Dolby Atmos soundbar as much room as you can if you want the best performance.
2. Don't skip the set-up and settings

While it may be tempting to jump straight into some movie watching or listening to music on your new soundbar, you'll likely want to take a moment to complete the set-up process and have a quick read through the settings if you want to get the best possible experience.
Is this the most fun step? Of course not, but it's vital if you want to get the most out of your Dolby Atmos soundbar, and it may be easier than you think. Sonos, Sennheiser, Sony and others feature intuitive companion apps, as well as quick and user friendly set-up processes, which usually involve lots of automated calibration that requires little input from you. They usually play a tone which the built in microphones will then detect and be able to map out your room in order to tune the sound to best suit the environment – pretty nifty if you ask us.
You'll also find various features such as sound presets, adaptive volume and usually a media remote and a way to link your music streaming service of choice within the settings menu, so don't miss out.
3. Don't use the wrong HDMI format

Most Atmos-equipped soundbars feature an HDMI-out socket for connecting it up to your TV using Enhanced Audio Return Channel (or eARC). This is by far the best way to connect your soundbar to your TV, as it offers the highest bandwidth for data transfer, and more importantly eARC is required for playing the lossless Dolby Atmos format. You can still play Dolby Atmos content through ARC (the non-enhanced variant with the lower bandwidth) via the Dolby TrueHD codec, but if you want the best experience then make sure that your soundbar and TV both support eARC.
Here is where we'd also recommend a good quality HDMI cable, as the ones bundled in with your TV or soundbar likely won't cut it if you want the best sound. A high-speed HDMI 2.1-certified cable may seem like a trivial upgrade at first, but trust us, it makes all the difference.
4. Don't wire up your system the wrong way
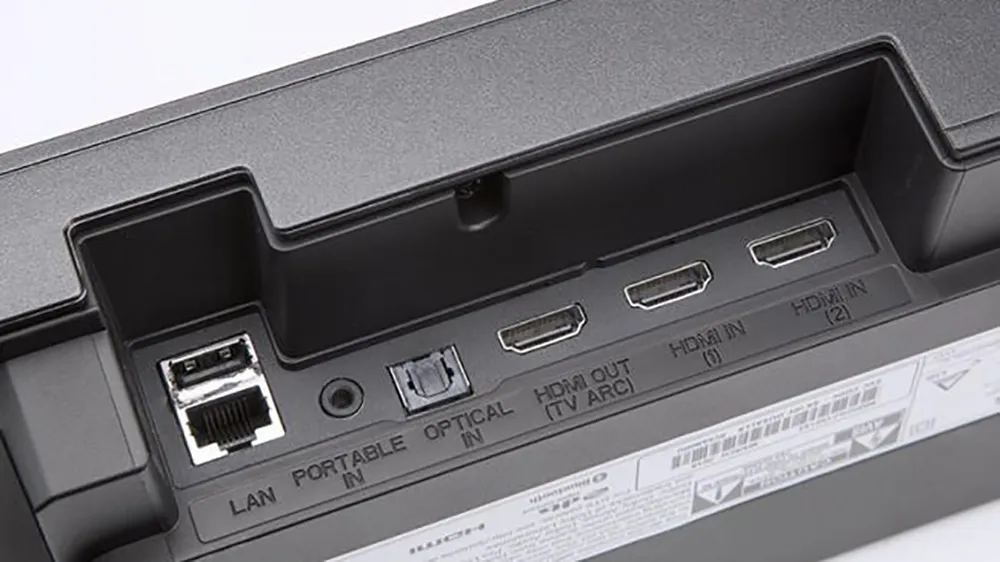
Most Dolby Atmos soundbars include HDMI passthrough ports in order to make up for the HDMI port that they're taking up, which is very considerate if you ask us. As HDMI 2.1 sockets are precious commodities, especially for gamers who need them for 4K/120Hz gaming on their PC, PS5 or Xbox Series X. These passthrough connections act as additional ports for you to plug these devices into so that you can (theoretically) get the best of both worlds.
While the sentiment is appreciated, and you'll likely see improvements in sound if you plug your HDMI-equipped device directly into the soundbar, it could introduce some issues relating to picture. We'd recommend checking the HDMI specifications of your soundar, as well as what HDR formats it supports.
Most high-end Dolby Atmos soundbars will support HDR10, HLG and Dolby Vision as well as 4K/120Hz passthrough, and the good news with the latter is that input lag is usually negligible – so feel free to plug your next-generation console in. But be sure to check if VRR and ALLM are also supported as this is also not always a given. In fact, one of the biggest and most expensive Dolby Atmos soundbars, the Sennheiser Ambeo Max, doesn't include any of these aforementioned features as it relies on HDMI 2.0 passthrough, so avoid plugging a console into that soundbar if you have it.
If you are watching Dolby Vision content, for example, via a 4K Blu-ray disc, make sure your soundbar supports that HDR format and if it does not, then hook your Blu-ray player up directly to the TV's built-in HDMI sockets.
5. Don't select the wrong sound format

The likelihood is that you've bought a Dolby Atmos soundbar in order to experience 3D audio, so just make sure your soundbar is actually outputting Atmos before you get stuck into a movie. You can check this in either your TV's sound settings menu if you're streaming directly from your TV's streaming apps, or in your media streamer, Blu-ray player or console settings if you are using an external streamer or disc player. Some soundbars include a display on the bar itself which should also say whether it's playing Dolby Atmos audio, but that depends on the model you are using.
If you do not see Dolby Atmos as an option, try selecting Dolby TrueHD or Dolby Digital initially and then play some Dolby Atmos content to see if it automatically switches; you may have to play Atmos content and then manually switch it if this does not work.
Finally, ensure your TV is outputting Bitstream audio if possible as this is the preferred method for Dolby Atmos decoding. PCM will be able to receive Atmos signals; however, it doesn't support height channels, meaning you'll miss out on a crucial part of the Atmos experience. Therefore, we recommend sticking with Bitstream, as it can receive and decode the signals as intended for the full effect.
Just follow these steps and you'll be able to master your new Dolby Atmos soundbar. Happy watching and listening!
MORE:
Read our latest Dolby Atmos soundbar review: Sennheiser Ambeo Soundbar Plus
Check out the best Dolby Atmos soundbar deals
Setting up more gear? Here are 7 crucial mistakes to avoid when setting up your hi-fi system
